
안녕하세요. 언제나 휴일입니다.
이번에는 안드로이드 앱을 제작할 거예요. (무료 동영상 강의)
작성하는 앱은 앞에서 작성한 WCF 서비스에서 제공하는 회원 가입, 탈퇴, 로그인, 로그아웃 기능을 이용합니다.
앞에서 작성한 ASP.NET 웹 사이트처럼 세 개의 activity(main, login, home)로 화면을 구성할게요.
1. 프로젝트 생성
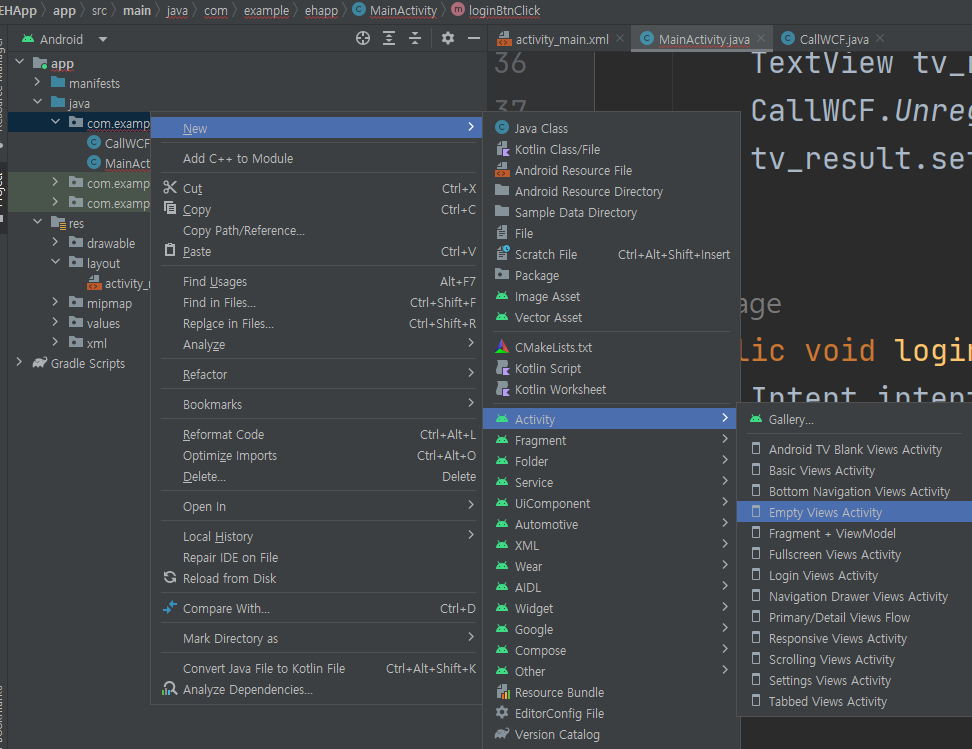
안드로이드 스튜디오에서 새 프로젝트를 생성한 후 Empty Views Activity를 선택합니다.
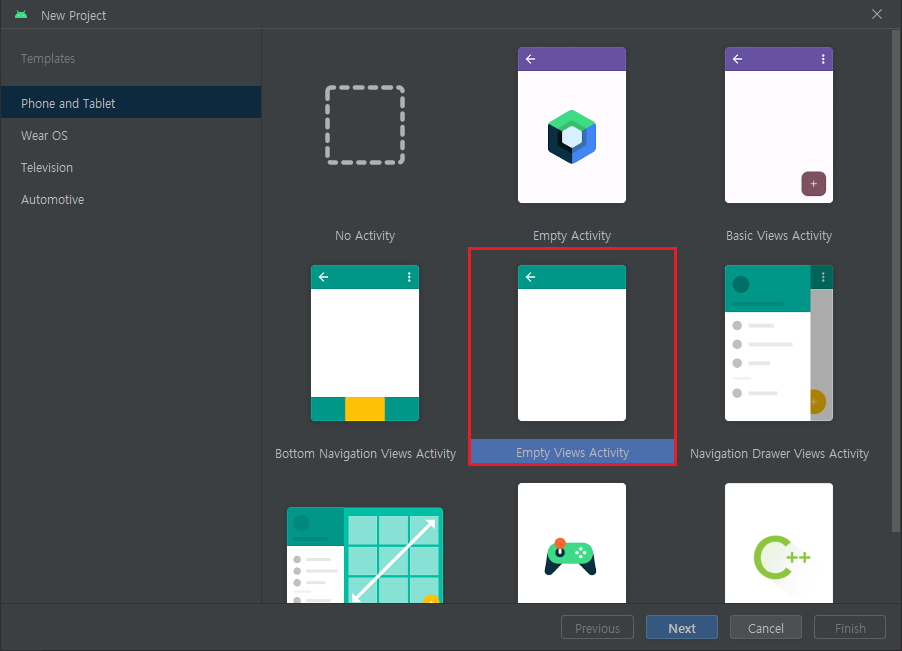
프로젝트 이름을 입력하고 Language를 Java를 선택합니다.

2. KSoap2 라이브러리 설치
안드로이드에서 WCF 서비스를 사용하기 위해서는 Soap 프로토콜을 이용합니다.
이를 위해 제공하는 라이브러리로 KSoap2가 있어요.
먼저 KSoap2 라이브러리를 다운로드 받습니다.(언제나휴일 깃허브에서 받기)
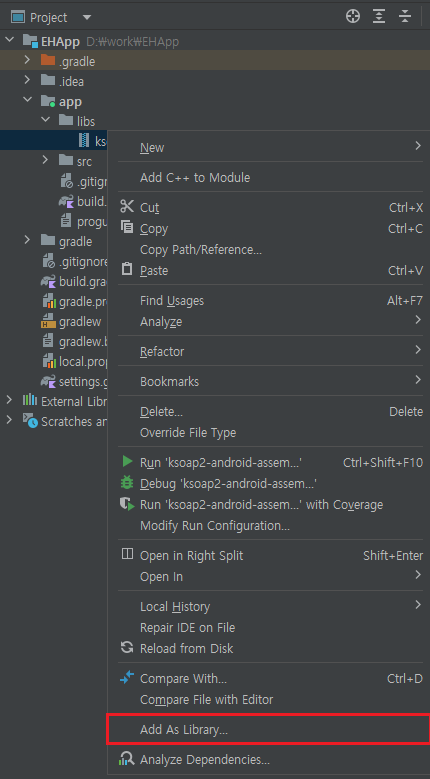
다운로드 받은 파일을 프로젝트가 있는 폴더의 app/lib 서브 폴더에 옮겨 놓습니다.

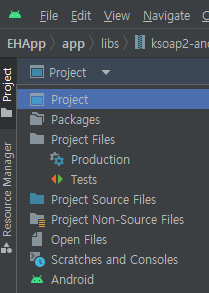
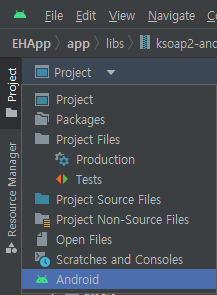
Project 항목으로 변경한 후 app\libs에 옮긴 라이브러리가 보입니다.
컨텍스트 메뉴를 띄운 후에 Add As Library…을 선택하세요.
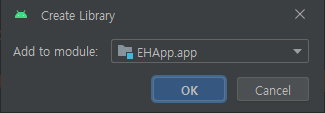
Create Library 창에서 Ok 버튼을 클릭하세요.
3. WCF 서비스 사용 클래스 정의하기
Android로 선택합니다.
먼저 프로젝트에 CallWCF 클래스를 추가합니다.

package와 클래스 정의문 사이에 필요한 모듈 import를 수행합니다.
package com.example.ehapp;
import org.ksoap2.SoapEnvelope;
import org.ksoap2.serialization.SoapObject;
import org.ksoap2.serialization.SoapSerializationEnvelope;
import org.ksoap2.transport.HttpTransportSE;
import android.os.StrictMode;
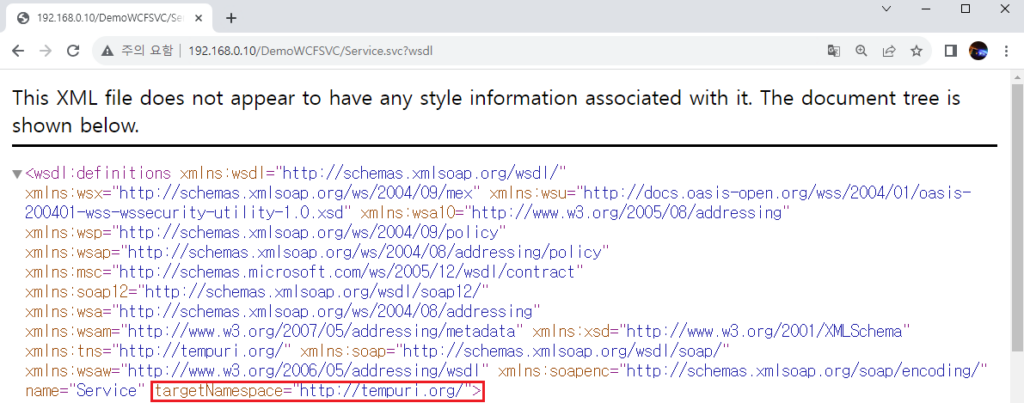
import org.ksoap2.serialization.SoapPrimitive;WCF 서비스 사이트 주소를 웹 브라우저에 입력하면 다음과 같은 화면을 볼 수 있습니다.
svcutil.exe 뒤에 있는 링크를 클릭하세요.
TargetNamespace 값을 확인합니다.
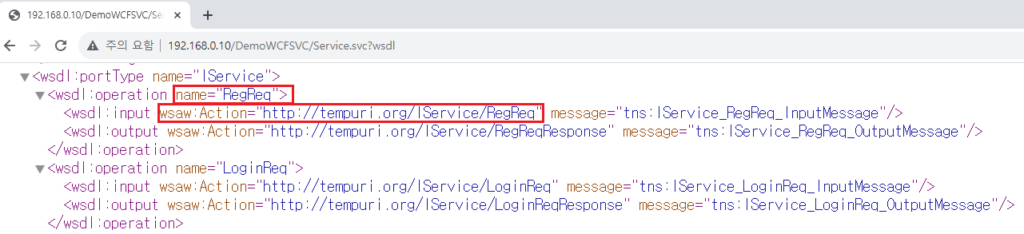
operation Name과 Action도 확인합니다.
location 값도 확인합니다.

CallWCF 클래스에 namespace와 location 값을 멤버로 설정합니다.
여기에서는 ns, url 이름으로 설정할게요.
public class CallWCF {
    static String ns = "http://tempuri.org/";
    static String url = "http://192.168.0.10/DemoWCFSVC/Service.svc";
3.1 가입 요청 메서드 구현
가입 요청 메서드를 구현합시다.
가입 요청은 id, pw, name을 입력 인자로 받습니다.
그리고 WCF 서비스의 호출할 메서드 이름과 action 이름을 지역 변수로 설정합니다.
    public static String RegReq(String id,String pw,String name){
        String methodname ="RegReq";
        String soapaction = "http://tempuri.org/IService/RegReq";
Thread 정책 모드를 설정합니다.
        StrictMode.ThreadPolicy policy = new StrictMode.ThreadPolicy.Builder().permitAll().build();
        StrictMode.setThreadPolicy(policy);
namespace와 호출할 메서드 이름을 인자로 SoapObject 개체를 생성하여 전달할 인자(id,pw,name)를 추가합니다.
        try {
            SoapObject request = new SoapObject(ns, methodname);
            request.addProperty("id", id);
            request.addProperty("pw", pw);
            request.addProperty("name", name);
Soap 프로토콜로 감싸기 위해 SoapSerializationEnvelope 개체(envelope)를 생성합니다.
envelope의 출력 SoapObject 개체를 설정합니다.
            SoapSerializationEnvelope envelope = new SoapSerializationEnvelope(SoapEnvelope.VER11);
            envelope.dotNet = true;
            envelope.setOutputSoapObject(request);
WCF 서비스 웹 사이트의 url 주소를 입력 인자로 HTT P전송 개체를 생성합니다.
Http 전송 개체에 SoapAction과 envelope을 입력 인자로 call 요청을 수행합니다.
수행한 결과는 envelope의 getResponse 호출로 얻어올 수 있습니다.
            HttpTransportSE hts = new HttpTransportSE(url);
            hts.call(soapaction, envelope);
            SoapPrimitive result = (SoapPrimitive) envelope.getResponse();
            return String.valueOf(result);
        }
        catch (Exception e) {
            return "예외"+e.getMessage();
        }

    }
다음은 RegReq 메서드 코드입니다.
    public static String RegReq(String id,String pw,String name){
        String methodname ="RegReq";
        String soapaction = "http://tempuri.org/IService/RegReq";
        StrictMode.ThreadPolicy policy = new StrictMode.ThreadPolicy.Builder().permitAll().build();
        StrictMode.setThreadPolicy(policy);
        try {
            SoapObject request = new SoapObject(ns, methodname);
            request.addProperty("id", id);
            request.addProperty("pw", pw);
            request.addProperty("name", name);

            SoapSerializationEnvelope envelope = new SoapSerializationEnvelope(SoapEnvelope.VER11);
            envelope.dotNet = true;
            envelope.setOutputSoapObject(request);


            HttpTransportSE hts = new HttpTransportSE(url);
            hts.call(soapaction, envelope);
            SoapPrimitive result = (SoapPrimitive) envelope.getResponse();
            return String.valueOf(result);
        }
        catch (Exception e) {
            return "예외"+e.getMessage();
        }

    }
3.2 탈퇴, 로그인, 로그아웃 요청 구현
탈퇴 요청, 로그인 요청, 로그아웃 요청 기능도 구현합시다.
입력 인자와 반환 형식, 호출할 메서드 이름, SoapAction 주소가 다를 뿐 전반적인 구현은 가입 요청과 차이가 없습니다.
3.3 CallWCF 클래스 전체 코드
package com.example.ehapp;
import org.ksoap2.SoapEnvelope;
import org.ksoap2.serialization.SoapObject;
import org.ksoap2.serialization.SoapSerializationEnvelope;
import org.ksoap2.transport.HttpTransportSE;
import android.os.StrictMode;
import  org.ksoap2.serialization.SoapPrimitive;
public class CallWCF {
    static String ns = "http://tempuri.org/";
    static String url = "http://192.168.0.10/DemoWCFSVC/Service.svc";
    public static String RegReq(String id,String pw,String name){
        String methodname ="RegReq";
        String soapaction = "http://tempuri.org/IService/RegReq";
        StrictMode.ThreadPolicy policy = new StrictMode.ThreadPolicy.Builder().permitAll().build();
        StrictMode.setThreadPolicy(policy);
        try {
            SoapObject request = new SoapObject(ns, methodname);
            request.addProperty("id", id);
            request.addProperty("pw", pw);
            request.addProperty("name", name);

            SoapSerializationEnvelope envelope = new SoapSerializationEnvelope(SoapEnvelope.VER11);
            envelope.dotNet = true;
            envelope.setOutputSoapObject(request);


            HttpTransportSE hts = new HttpTransportSE(url);
            hts.call(soapaction, envelope);
            SoapPrimitive result = (SoapPrimitive) envelope.getResponse();
            return String.valueOf(result);
        }
        catch (Exception e) {
            return "예외"+e.getMessage();
        }

    }
    public static String UnregReq(String id,String pw){
        String methodname ="UnregReq";
        String soapaction = "http://tempuri.org/IService/UnregReq";
        StrictMode.ThreadPolicy policy = new StrictMode.ThreadPolicy.Builder().permitAll().build();
        StrictMode.setThreadPolicy(policy);
        try {
            SoapObject request = new SoapObject(ns, methodname);
            request.addProperty("id", id);
            request.addProperty("pw", pw);

            SoapSerializationEnvelope envelope = new SoapSerializationEnvelope(SoapEnvelope.VER11);
            envelope.dotNet = true;
            envelope.setOutputSoapObject(request);
            HttpTransportSE hts = new HttpTransportSE(url);
            hts.call(soapaction, envelope);
            SoapPrimitive result = (SoapPrimitive) envelope.getResponse();
            return "";
        }
        catch (Exception e) {
            return "예외"+e.getMessage();
        }
    }
    public static String LoginReq(String id,String pw){
        String methodname ="LoginReq";
        String soapaction = "http://tempuri.org/IService/LoginReq";
        StrictMode.ThreadPolicy policy = new StrictMode.ThreadPolicy.Builder().permitAll().build();
        StrictMode.setThreadPolicy(policy);
        try {
            SoapObject request = new SoapObject(ns, methodname);
            request.addProperty("id", id);
            request.addProperty("pw", pw);

            SoapSerializationEnvelope envelope = new SoapSerializationEnvelope(SoapEnvelope.VER11);
            envelope.dotNet = true;
            envelope.setOutputSoapObject(request);
            HttpTransportSE hts = new HttpTransportSE(url);
            hts.call(soapaction, envelope);

            SoapPrimitive result = (SoapPrimitive) envelope.getResponse();
            return result.toString();
        }
        catch (Exception e) {
            return "예외"+e.getMessage();
        }
    }
    public static String LogoutReq(String id,String pw){
        String methodname ="LogoutReq";
        String soapaction = "http://tempuri.org/IService/LogoutReq";
        StrictMode.ThreadPolicy policy = new StrictMode.ThreadPolicy.Builder().permitAll().build();
        StrictMode.setThreadPolicy(policy);
        try {
            SoapObject request = new SoapObject(ns, methodname);
            request.addProperty("id", id);
            request.addProperty("pw", pw);

            SoapSerializationEnvelope envelope = new SoapSerializationEnvelope(SoapEnvelope.VER11);
            envelope.dotNet = true;
            envelope.setOutputSoapObject(request);
            HttpTransportSE hts = new HttpTransportSE(url);
            hts.call(soapaction, envelope);
            return "";
        }
        catch (Exception e) {
            return "예외"+e.getMessage();
        }
    }
}
3.4 Manifest에 인터넷 퍼미션 설정하기
Http 전송을 위해서는 안드로이드의 인터넷 퍼미션을 설정해 주어야 합니다.
이러한 설정은 AndroidManifest .xml파일에 다음 구문을 추가해 주어야 합니다.
<uses-permission android:name="android.permission.INTERNET" />그리고 application 요소에 다음 attribute를 추가해야 합니다.
android:usesCleartextTraffic="true"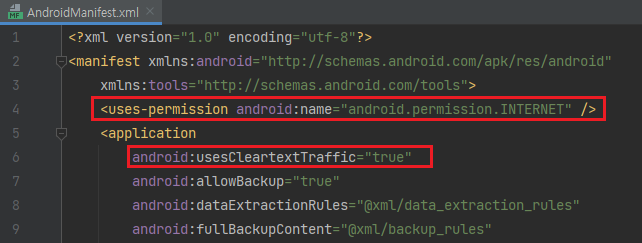
4. Activity 구현
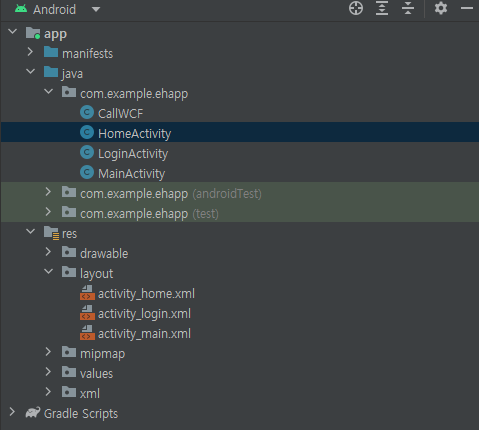
기본으로 제공한 activity_main 외에 activity_login과 activity_home을 추가합니다.
다음은 activity를 추가한 후의 모습입니다.
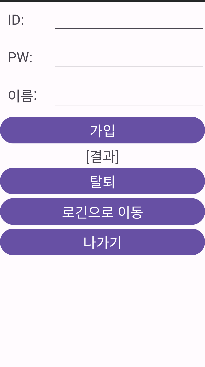
4.1 MainActivity 구현
ID, PW, 이름을 입력하여 가입 및 탈퇴를 요청할 수 있습니다.
로긴 activity로 이동하거나 앱을 나가기를 지원합니다.
다음처럼 Layout을 배치하세요.
activity_main.xml 코드는 다음과 같습니다.
버튼마다 클릭 (onClick) 이벤트 처리 메서드를 설정하였습니다.
<?xml version="1.0" encoding="utf-8"?>
<LinearLayout
    xmlns:android="http://schemas.android.com/apk/res/android"
    xmlns:app="http://schemas.android.com/apk/res-auto"
    xmlns:tools="http://schemas.android.com/tools"
    android:layout_width="match_parent"
    android:layout_height="match_parent"
    tools:context=".MainActivity"
    android:orientation="vertical">
    <LinearLayout
        android:layout_width="match_parent"
        android:layout_height="wrap_content"
        android:orientation="horizontal">
        <TextView
            android:layout_width="160px"
            android:layout_height="wrap_content"
            android:text="ID:"
            android:textSize="28sp"
            android:layout_margin="40px"
            ></TextView>
        <EditText
            android:layout_margin="40px"
            android:layout_width="800px"
            android:layout_height="wrap_content"
            android:id="@+id/et_id"/>
    </LinearLayout>

    <LinearLayout
        android:layout_width="match_parent"
        android:layout_height="wrap_content"
        android:orientation="horizontal">
        <TextView
            android:layout_width="160px"
            android:layout_height="wrap_content"
            android:text="PW:"
            android:textSize="28sp"
            android:layout_margin="40px"
            ></TextView>
        <EditText
            android:id="@+id/et_pw"
            android:layout_margin="40px"
            android:layout_width="800px"
            android:layout_height="wrap_content"
         />
    </LinearLayout>
    <LinearLayout
        android:layout_width="match_parent"
        android:layout_height="wrap_content"
        android:orientation="horizontal">
        <TextView
            android:layout_width="160px"
            android:layout_height="wrap_content"
            android:text="이름:"
            android:textSize="28sp"
            android:layout_margin="40px"
            ></TextView>
        <EditText
            android:id="@+id/et_name"
            android:layout_margin="40px"
            android:layout_width="800px"
            android:layout_height="wrap_content" />
    </LinearLayout>

    <Button
        android:id="@+id/btn_reg"
        android:onClick="regBtnClick"
        android:layout_width="match_parent"
        android:layout_height="wrap_content"
        android:textSize="28sp"
        android:text="가입"
        />

    <TextView
        android:id="@+id/tv_result"
        android:layout_width="match_parent"
        android:layout_height="wrap_content"
        android:text="[결과]"
        android:textSize="28sp"
        android:textAlignment="center"
        android:gravity="center"/>
    <Button
        android:id="@+id/btn_unreg"
        android:onClick="unregBtnClick"
        android:layout_width="match_parent"
        android:layout_height="wrap_content"
        android:textSize="28sp"
        android:text="탈퇴"
        />
    <Button
        android:id="@+id/btn_login"
        android:layout_width="match_parent"
        android:layout_height="wrap_content"
        android:textSize="28sp"
        android:onClick="loginBtnClick"
        android:text="로긴으로 이동"
        />
    <Button
        android:id="@+id/btn_exit"
        android:layout_width="match_parent"
        android:layout_height="wrap_content"
        android:textSize="28sp"
        android:onClick="exitBtnClick"
        android:text="나가기"
        />
</LinearLayout>
MainActivity.java 코드를 구현합시다.
먼저 필요한 import 구문입니다.
package com.example.ehapp;

import androidx.appcompat.app.AppCompatActivity;
import android.os.Bundle;
import android.view.View;
import android.widget.EditText;
import android.widget.TextView;
import android.content.Intent;
onCreate 메서드는 수정할 부분이 없습니다.
public class MainActivity extends AppCompatActivity {

    @Override
    protected void onCreate(Bundle savedInstanceState) {
        super.onCreate(savedInstanceState);
        setContentView(R.layout.activity_main);
    }
가입 버튼 onClick 이벤트 처리기에서는 입력한 id, pw,name을 얻어온 후에 CallWCF의 RegReq 메서드를 호출하여 결과를 result TextView의 Text에 설정합니다.
    public void regBtnClick(View view){
        EditText et_id = (EditText) findViewById(R.id.et_id);
        EditText et_pw = (EditText) findViewById(R.id.et_pw);
        EditText et_name = (EditText) findViewById(R.id.et_name);
        String id = et_id.getText().toString();
        String pw = et_pw.getText().toString();
        String name = et_name.getText().toString();

        TextView tv_result = (TextView) findViewById(R.id.tv_result);
        String result = CallWCF.RegReq(id,pw,name);
        tv_result.setText(result);
    }
탈퇴 버튼 클릭 이벤트 처리기에서도 입력한 id,pw를 얻어온 후에 CallWCF의 UnregReq 메서드를 호출합니다.
    public void unregBtnClick(View view){
        EditText et_id = (EditText) findViewById(R.id.et_id);
        EditText et_pw = (EditText) findViewById(R.id.et_pw);
        String id = et_id.getText().toString();
        String pw = et_pw.getText().toString();

        TextView tv_result = (TextView) findViewById(R.id.tv_result);
        CallWCF.UnregReq(id,pw);
        tv_result.setText("탈퇴 신청하였습니다.");

    }
로긴 버튼 클릭 이벤트 처리기에서는 LoginActivity로 화면을 전이시킵니다.
    public void loginBtnClick(View view){
        Intent intent = new Intent(getApplicationContext(),
                LoginActivity.class);
        startActivity(intent);
    }
나가기 버튼 클릭 이벤트 처리기에서는 finissh 함수를 호출합니다.
    public void exitBtnClick(View view){
        finish();
    }
다음은 MainActivity.java 소스 코드입니다.
package com.example.ehapp;
import androidx.appcompat.app.AppCompatActivity;
import android.os.Bundle;
import android.view.View;
import android.widget.EditText;
import android.widget.TextView;
import android.content.Intent;
public class MainActivity extends AppCompatActivity {
@Override
protected void onCreate(Bundle savedInstanceState) {
super.onCreate(savedInstanceState);
setContentView(R.layout.activity_main);
}
public void regBtnClick(View view){
EditText et_id = (EditText) findViewById(R.id.et_id);
EditText et_pw = (EditText) findViewById(R.id.et_pw);
EditText et_name = (EditText) findViewById(R.id.et_name);
String id = et_id.getText().toString();
String pw = et_pw.getText().toString();
String name = et_name.getText().toString();
TextView tv_result = (TextView) findViewById(R.id.tv_result);
String result = CallWCF.RegReq(id,pw,name);
tv_result.setText(result);
}
public void unregBtnClick(View view){
EditText et_id = (EditText) findViewById(R.id.et_id);
EditText et_pw = (EditText) findViewById(R.id.et_pw);
String id = et_id.getText().toString();
String pw = et_pw.getText().toString();
TextView tv_result = (TextView) findViewById(R.id.tv_result);
CallWCF.UnregReq(id,pw);
tv_result.setText("탈퇴 신청하였습니다.");
}
public void loginBtnClick(View view){
Intent intent = new Intent(getApplicationContext(),
LoginActivity.class);
startActivity(intent);
}
public void exitBtnClick(View view){
finish();
}
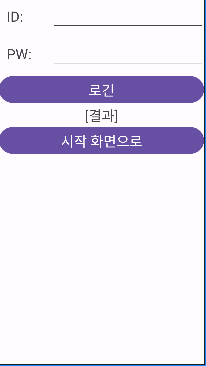
}4.2 LoginActivity 구현
activity_login은 다음처럼 id, pw를 입력할 수 있게 배치합니다.
그리고 로긴 버튼과 결과 TextView와 시작 화면으로 전이하는 버튼을 배치합니다.
두 개의 버튼에 클릭 이벤트 처리기(onClick)를 설정합니다.
activity_login.xml의 코드는 다음과 같습니다.
<?xml version="1.0" encoding="utf-8"?>
<LinearLayout xmlns:android="http://schemas.android.com/apk/res/android"
    xmlns:app="http://schemas.android.com/apk/res-auto"
    xmlns:tools="http://schemas.android.com/tools"
    android:layout_width="match_parent"
    android:layout_height="match_parent"
    tools:context=".LoginActivity"
    android:orientation="vertical"
    >
    <LinearLayout
        android:layout_width="match_parent"
        android:layout_height="wrap_content"
        android:orientation="horizontal">
        <TextView
            android:layout_width="160px"
            android:layout_height="wrap_content"
            android:text="ID:"
            android:textSize="28sp"
            android:layout_margin="40px"
            ></TextView>
        <EditText
            android:layout_margin="40px"
            android:layout_width="800px"
            android:layout_height="wrap_content"
            android:id="@+id/et_id"/>
    </LinearLayout>

    <LinearLayout
        android:layout_width="match_parent"
        android:layout_height="wrap_content"
        android:orientation="horizontal">
        <TextView
            android:layout_width="160px"
            android:layout_height="wrap_content"
            android:text="PW:"
            android:textSize="28sp"
            android:layout_margin="40px"
            ></TextView>
        <EditText
            android:id="@+id/et_pw"
            android:layout_margin="40px"
            android:layout_width="800px"
            android:layout_height="wrap_content"
            />
    </LinearLayout>
    <Button
        android:id="@+id/btn_login"
        android:onClick="loginBtnClick"
        android:layout_width="match_parent"
        android:layout_height="wrap_content"
        android:textSize="28sp"
        android:text="로긴"
        />
    <TextView
        android:id="@+id/tv_result"
        android:layout_width="match_parent"
        android:layout_height="wrap_content"
        android:text="[결과]"
        android:textSize="28sp"
        android:textAlignment="center"
        android:gravity="center"/>
    <Button
        android:id="@+id/btn_gomain"
        android:onClick="gomainBtnClick"
        android:layout_width="match_parent"
        android:layout_height="wrap_content"
        android:textSize="28sp"
        android:text="시작 화면으로"
        />

</LinearLayout>
LoginActivity.java 파일의 소스 코드를 구현합시다.
먼저 포함할 import 구문입니다.
package com.example.ehapp;

import androidx.appcompat.app.AppCompatActivity;

import android.content.Intent;
import android.os.Bundle;
import android.view.View;
import android.widget.EditText;
import android.widget.TextView;
onCreate 메서드는 수정할 부분이 없습니다.
public class LoginActivity extends AppCompatActivity {

    @Override
    protected void onCreate(Bundle savedInstanceState) {
        super.onCreate(savedInstanceState);
        setContentView(R.layout.activity_login);
    }
로그인 버튼 클릭 이벤트 처리기에서는 입력한 id, pw를 얻어옵니다.
CallWCF의 LoginReq를 호출한 후에 반환한 이름이 있을 때 로그인 성공입니다.
성공했을 때 name, id, pw를 입력 인자로 HomeActivity를 시작합니다.
    public void loginBtnClick(View view){
        EditText et_id = (EditText) findViewById(R.id.et_id);
        EditText et_pw = (EditText) findViewById(R.id.et_pw);
        String id = et_id.getText().toString();
        String pw = et_pw.getText().toString();

        TextView tv_result = (TextView) findViewById(R.id.tv_result);
        String name = CallWCF.LoginReq(id,pw);
        if (!name.equals("")){
            tv_result.setText(name);
            Intent intent = new Intent(LoginActivity.this,
                    HomeActivity.class);
            intent.putExtra("name",name);
            intent.putExtra("id",id);
            intent.putExtra("pw",pw);
            startActivity(intent);
            finish();
        }
        else {
            tv_result.setText("로긴 실패하였습니다.");
        }
    }
시작 화면으로 돌아가기 버튼 처리기에서는 LoginActivity를 종료(finish 함수 호출)합니다.
    public void gomainBtnClick(View view){
        finish();
    }
다음은 LoginActivity.java의 소스 코드입니다.
package com.example.ehapp;

import androidx.appcompat.app.AppCompatActivity;

import android.content.Intent;
import android.os.Bundle;
import android.view.View;
import android.widget.EditText;
import android.widget.TextView;

public class LoginActivity extends AppCompatActivity {

    @Override
    protected void onCreate(Bundle savedInstanceState) {
        super.onCreate(savedInstanceState);
        setContentView(R.layout.activity_login);
    }
    public void loginBtnClick(View view){
        EditText et_id = (EditText) findViewById(R.id.et_id);
        EditText et_pw = (EditText) findViewById(R.id.et_pw);
        String id = et_id.getText().toString();
        String pw = et_pw.getText().toString();

        TextView tv_result = (TextView) findViewById(R.id.tv_result);
        String name = CallWCF.LoginReq(id,pw);
        if (!name.equals("")){
            tv_result.setText(name);
            Intent intent = new Intent(LoginActivity.this,
                    HomeActivity.class);
            intent.putExtra("name",name);
            intent.putExtra("id",id);
            intent.putExtra("pw",pw);
            startActivity(intent);
            finish();
        }
        else {
            tv_result.setText("로긴 실패하였습니다.");
        }
    }
    public void gomainBtnClick(View view){
        finish();
    }
}
4.3 HomeActivity 구현
activity_home은 다음처럼 사용자 이름, 환영 인사, 로그 아웃 버튼을 배치합니다.
로그 아웃 버튼에 클릭 이벤트 처리기(onClick)를 설정합니다.

activity_home.xml 코드는 다음과 같습니다.
<?xml version="1.0" encoding="utf-8"?>
<LinearLayout xmlns:android="http://schemas.android.com/apk/res/android"
    xmlns:app="http://schemas.android.com/apk/res-auto"
    xmlns:tools="http://schemas.android.com/tools"
    android:layout_width="match_parent"
    android:layout_height="match_parent"
    tools:context=".HomeActivity"
    android:orientation="vertical">
    <LinearLayout
        android:layout_width="match_parent"
        android:layout_height="wrap_content"
        android:orientation="horizontal">
        <TextView
            android:text="[홍길동]"
            android:id="@+id/tv_name"
            android:textSize="28sp"
            android:layout_width="wrap_content"
            android:layout_height="wrap_content"/>
        <TextView
            android:text="님 방가"
            android:textSize="28sp"
            android:layout_width="wrap_content"
            android:layout_height="wrap_content"/>
    </LinearLayout>
    <Button
        android:id="@+id/btn_logout"
        android:onClick="logoutBtnClick"
        android:layout_width="match_parent"
        android:layout_height="wrap_content"
        android:textSize="28sp"
        android:text="로그 아웃"
        />

</LinearLayout>
HomeActivity.java 파일의 소스 코드를 구현합시다.
먼저 포함할 import 구문입니다.
package com.example.ehapp;

import androidx.appcompat.app.AppCompatActivity;
import android.content.Intent;
import android.os.Bundle;
import android.view.View;
import android.widget.TextView;
HomeActivity 클래스에 멤버 필드로 id와 pw를 캡슐화합니다.
public class HomeActivity extends AppCompatActivity {

    String id;
    String pw;
onCreate 메서드에서는 전달받은 이름을 TextView의 Text 속성에 설정합니다.
그리고 id와 pw 멤버 필드를 설정합니다.
    @Override
    protected void onCreate(Bundle savedInstanceState) {
        super.onCreate(savedInstanceState);
        setContentView(R.layout.activity_home);
        TextView tv = (TextView)findViewById(R.id.tv_name);
        Intent intent = getIntent();
        String name = intent.getStringExtra("name");
        tv.setText(name);
        id = intent.getStringExtra("id");
        pw = intent.getStringExtra("pw");

    }
로그아웃 버튼 클릭 이벤트 처리기에서는 CallWCF의 LogoutReq 함수를 호출합니다.
그리고 LoginActivity를 띄웁니다.
    public void logoutBtnClick(View view){
        CallWCF.LogoutReq(id,pw);
        Intent intent = new Intent(HomeActivity.this,
                LoginActivity.class);
        startActivity(intent);
        finish();
    }
다음은 HomeActivity.java 소스 코드입니다.
package com.example.ehapp;

import androidx.appcompat.app.AppCompatActivity;
import android.content.Intent;
import android.os.Bundle;
import android.view.View;
import android.widget.TextView;

public class HomeActivity extends AppCompatActivity {

    String id;
    String pw;


    @Override
    protected void onCreate(Bundle savedInstanceState) {
        super.onCreate(savedInstanceState);
        setContentView(R.layout.activity_home);
        TextView tv = (TextView)findViewById(R.id.tv_name);
        Intent intent = getIntent();
        String name = intent.getStringExtra("name");
        tv.setText(name);
        id = intent.getStringExtra("id");
        pw = intent.getStringExtra("pw");

    }
    public void logoutBtnClick(View view){
        CallWCF.LogoutReq(id,pw);
        Intent intent = new Intent(HomeActivity.this,
                LoginActivity.class);
        startActivity(intent);
        finish();

    }
}