
이번에는 자식 컨트롤을 배치할 때 사용하는 Layout 중에 순차적으로 배치하는 LinearLayout을 사용하는 간단한 앱을 작성합시다.
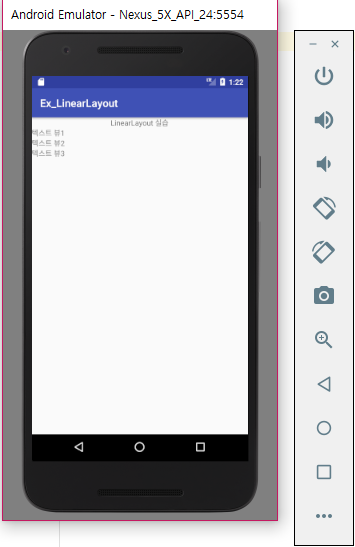
먼저 Empty Activity 형태의 프로젝트를 생성하세요. 그리고 activity_main.xml 파일을 다음처럼 수정하세요. 여러분께서 목적에 따라 직접 입력을 하거나 자동 완성 기능을 사용하세요.
<?xml version="1.0" encoding="utf-8"?>
<LinearLayout xmlns:android="http://schemas.android.com/apk/res/android"
    xmlns:tools="http://schemas.android.com/tools"
    android:layout_width="match_parent"
    android:layout_height="fill_parent"
    android:orientation="vertical">
    <!-- 이곳에 자식 요소 배치 -->
    <TextView
        android:text="LinearLayout 실습"
        android:layout_width="match_parent"
        android:layout_height="wrap_content"
        android:textAlignment="center"/>
    <TextView
        android:text="텍스트 뷰1"
        android:layout_width="match_parent"
        android:layout_height="wrap_content" />
    <TextView
        android:text="텍스트 뷰2"
        android:layout_width="match_parent"
        android:layout_height="wrap_content" />
    <TextView
        android:text="텍스트 뷰3"
        android:layout_width="match_parent"
        android:layout_height="wrap_content" />
</LinearLayout>
LinearLayout에 자식을 배치할 때 위에서 아래로 배치할 때는 orientation 속성을 vertical로 설정합니다.