| 일 | 월 | 화 | 수 | 목 | 금 | 토 |
|---|---|---|---|---|---|---|
| 1 | 2 | 3 | 4 | 5 | 6 | 7 |
| 8 | 9 | 10 | 11 | 12 | 13 | 14 |
| 15 | 16 | 17 | 18 | 19 | 20 | 21 |
| 22 | 23 | 24 | 25 | 26 | 27 | 28 |
- 강의
- 캡슐화
- 표준 입출력
- 언제나 휴일
- 실습으로 다지는 c#
- Windows Forms
- 동영상 강의
- 알고리즘
- 동영상
- 충남 천안
- 소스 코드
- 파이썬
- 원격 제어 프로그램
- 유튜브 동영상 강의
- 산책하기 좋은 곳
- 실습
- c언어
- 언제나휴일
- 독립기념관
- 네트워크 프로그래밍
- 추천
- C++
- 표준 라이브러리 함수
- 졸업 작품 소재
- 프로젝트
- 클래스 다이어그램
- c#
- 무료 동영상 강의
- 안드로이드 앱 개발
- 소켓 통신
- Today
- Total
프로그래밍 언어 및 기술 [언제나휴일]
4. 기본 컨트롤 – 8. ProgressBar 본문
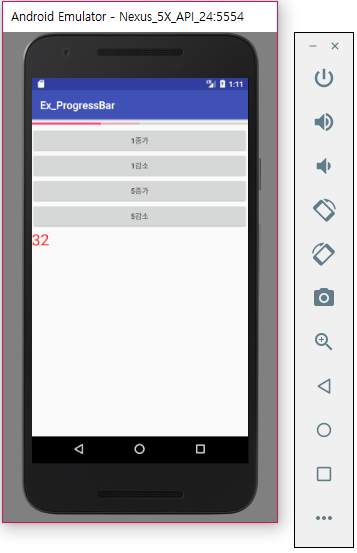
이번에는 진행 상태 정도를 표시할 때 많이 사용하는 ProgressBar를 이용하는 간단한 실습을 합시다.

먼저 activity_main.xml 파일에 컨트롤을 배치합시다. 최상위 요소는 LinearLayout을 배치하세요. 그리고 자식으로 ProgressBar와 네 개의 Button과 TextView를 배치합니다. 네 개의 버튼은 ProgressBar에 진행 상태의 정도를 1 증가, 5 증가, 1 감소, 5 감소시킬 때 사용하기 위함입니다. 이를 위해 네 개의 버튼의 onClick 속성을 지정하세요. 이는 Java 소스에서 정의할 메서드 이름입니다.
그리고 ProgressBar의 max 속성을 100으로 지정하고 progress 속성은 0으로 지정합시다. progress 속성은 현재 진행 상태 정도를 나타내는 값입니다. 그리고 중간 정도의 상태의 위치를 나타내기 쉽게 secondaryProgress 속성을 사용할 수 있습니다.
<?xml version="1.0" encoding="utf-8"?>
<LinearLayout xmlns:android="http://schemas.android.com/apk/res/android"
    xmlns:app="http://schemas.android.com/apk/res-auto"
    xmlns:tools="http://schemas.android.com/tools"
    android:layout_width="match_parent"
    android:layout_height="match_parent"
    tools:context="com.example.ehclub.ex_progressbar.MainActivity"
    android:orientation="vertical">
    <ProgressBar
        style="?android:attr/progressBarStyleHorizontal"
        android:id="@+id/pro"
        android:layout_width="match_parent"
        android:layout_height="wrap_content"
        android:max="100"
        android:progress="0"
        android:secondaryProgress="50"
        />
    <Button
        android:id="@+id/btn_1inc"
        android:layout_width="match_parent"
        android:layout_height="wrap_content"
        android:onClick="onBtnClick"
        android:text="1증가" />
    <Button
        android:id="@+id/btn_1dec"
        android:layout_width="match_parent"
        android:layout_height="wrap_content"
        android:onClick="onBtnClick"
        android:text="1감소" />
    <Button
        android:id="@+id/btn_5inc"
        android:layout_width="match_parent"
        android:layout_height="wrap_content"
        android:onClick="onBtnClick"
        android:text="5증가" />
    <Button
        android:id="@+id/btn_5dec"
        android:layout_width="match_parent"
        android:layout_height="wrap_content"
        android:onClick="onBtnClick"
        android:text="5감소" />
    <TextView
        android:id="@+id/tv"
        android:layout_width="match_parent"
        android:layout_height="wrap_content"
        android:textSize="30sp"
        android:textColor="#FF0000"
        android:text="0"/>


</LinearLayout>
이제 MainActivity.java 파일을 편집합시다. 먼저 MainActivity 클래스에 ProgressBar 형식 멤버 필드를 선언하세요.
ProgressBar pb;onCreate 메서드에서는 xml 파일에서 배치한 ProgressBar를 참조할 수 있게 findViewById 메서드를 호출합니다.
ProgressBar pb;네 개의 버튼의 onClick 이벤트 핸들러를 작성합시다. 먼저 전달받은 View 개체의 getId 메서드를 호출하여 어느 버튼을 클릭한 것인지 판별합니다. 그리고 이에 따라 ProgressBar의 incrementProgressBar 메서드를 호출하여 증가 혹은 감소시키세요. 그리고 getProgress메서드를 호출하여 현재 진행 상태 정도를 확인하여 텍스트 뷰의 text 속성을 설정하세요.
    public   void onBtnClick(View v){

        switch (v.getId()){
            case R.id.btn_1inc: pb.incrementProgressBy(1);break;
            case R.id.btn_5inc: pb.incrementProgressBy(5);break;
            case R.id.btn_1dec: pb.incrementProgressBy(-1);break;
            case R.id.btn_5dec: pb.incrementProgressBy(-5);break;
        }
        TextView tv = (TextView)findViewById(R.id.tv);
        int now = pb.getProgress();
        tv.setText(String.valueOf(now));
    }
다음음 MainActivity.java 파일의 내용입니다.
package com.example.ehclub.ex_progressbar;

import android.os.StrictMode;
import android.provider.Telephony;
import android.support.v7.app.AppCompatActivity;
import android.os.Bundle;
import android.view.View;
import android.widget.Button;
import android.widget.ProgressBar;
import android.widget.TextView;

public class MainActivity extends AppCompatActivity {

    ProgressBar pb;
    @Override
    protected void onCreate(Bundle savedInstanceState) {
        super.onCreate(savedInstanceState);
        setContentView(R.layout.activity_main);
        pb = (ProgressBar)findViewById(R.id.pro);
    }
    public   void onBtnClick(View v){

        switch (v.getId()){
            case R.id.btn_1inc: pb.incrementProgressBy(1);break;
            case R.id.btn_5inc: pb.incrementProgressBy(5);break;
            case R.id.btn_1dec: pb.incrementProgressBy(-1);break;
            case R.id.btn_5dec: pb.incrementProgressBy(-5);break;
        }
        TextView tv = (TextView)findViewById(R.id.tv);
        int now = pb.getProgress();
        tv.setText(String.valueOf(now));
    }
}
언제나휴일 추천 여행 및 산책
'Java 안드로이드 > 안드로이드' 카테고리의 다른 글
| 4. 기본 컨트롤 – 13. TabHost (0) | 2025.01.04 |
|---|---|
| 4. 기본 컨트롤 – 12. Custom ListView (0) | 2025.01.04 |
| 4. 기본 컨트롤 – 11. ListView (0) | 2025.01.04 |
| 4. 기본 컨트롤 – 10. SeekBar (0) | 2025.01.04 |
| 4. 기본 컨트롤 – 7. ToggleButton (0) | 2025.01.04 |
| 4. 기본 컨트롤 – 6. Switch (0) | 2025.01.04 |
| 4. 기본 컨트롤 – 5. RadioButton (0) | 2025.01.04 |
| 4. 기본 컨트롤 – 4. CheckBox (0) | 2025.01.04 |


