Java 안드로이드/안드로이드
4. 기본 컨트롤 – 2. EditText
언휴
2025. 1. 4. 07:50
이번에는 사용자가 문자열을 입력할 때 사용하는 EditText를 사용하는 간단한 실습을 해 봅시다.
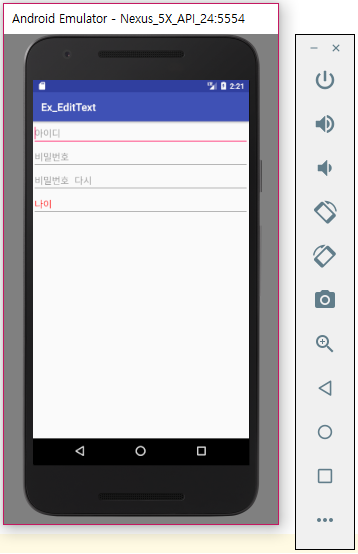
EditText 에 사용자가 어떤 값을 입력할 것인지 미리 정보를 주고자 한다면 hint 속성을 사용하세요.
힌트의 글자색은 textColorHint 속성을 사용합니다.
또한 EditText에 입력해야 할 형식이 수일 때는 inputType을 number로 지정합니다.
만약 비밀번호를 입력하는 것이라면 inputType을 textPassword를 지정합니다.
<?xml version="1.0" encoding="utf-8"?>
<LinearLayout xmlns:android="http://schemas.android.com/apk/res/android"
    xmlns:app="http://schemas.android.com/apk/res-auto"
    xmlns:tools="http://schemas.android.com/tools"
    android:layout_width="match_parent"
    android:layout_height="match_parent"
    tools:context="com.example.ehclub.ex_edittext.MainActivity"
    android:orientation="vertical">

    <EditText
        android:layout_width="match_parent"
        android:layout_height="wrap_content"
        android:hint="아이디"/>
    <EditText
        android:layout_width="match_parent"
        android:layout_height="wrap_content"
        android:hint="비밀번호"
        android:inputType="textPassword"/>
    <EditText
        android:layout_width="match_parent"
        android:layout_height="wrap_content"
        android:hint="비밀번호 다시"
        android:inputType="textPassword"/>
    <EditText
        android:layout_width="match_parent"
        android:layout_height="wrap_content"
        android:textColorHint="#FF0000"
        android:hint="나이"
        android:inputType="number"/>
</LinearLayout>
언제나휴일 추천 여행 및 산책